- style
How to Automatically Fix Broken Links in SharePoint
Author: The content of this macro can only be viewed by users who have logged in.
This article applies to SharePoint Essentials Toolkit v6.1.3.0 and later
After running a “Broken Link” report the next logical step is to automatically fix the found links with the correct values.
This process supports
- All SharePoint web pages
- Web parts including web part properties
- Web page contents including JavaScript links, CSS references, image and internal/external links.
- Web Page metadata including Page Layout, Note fields, Body fields, Summary Links etc.
- SharePoint List Items metadata including Title, Description, Note fields, Hyperlink Fields, etc.
- SharePoint List Items attachments (links inside of PDF, MS Word, MS Excel (cells & formulas), html, xml, xslt, etc) are supported
- SharePoint Document Library metadata including Title, Description, Note fields, Hyperlink Fields, etc.
- SharePoint Document Library file contents, such as links inside of PDFs, Word, Excel, Excel Formulas, InfoPath forms, and any other supported file type.
- If you are having any difficulty detecting links, please contact use for support
Step-by-step guide
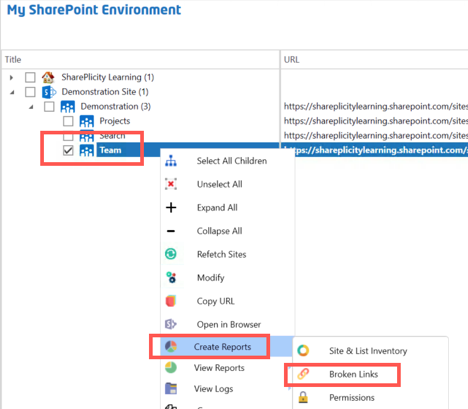
- First, navigate to the Home Page Dashboard by clicking the Home tab (see “My SharePoint Environment” dashboard below), right select one or more sites you wish to find links for, and choose “Create Reports”, then “Broken Links”.
This will bring up the Job Options page, where you can customize what is reported on.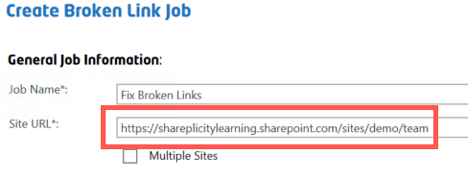
Ensure that in the “Job Options”, “Scan List Item Attachment File Contents” and “Scan Document File Contents” are both checked.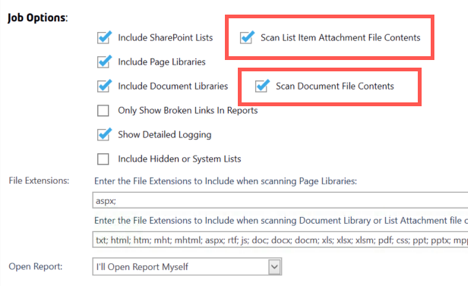
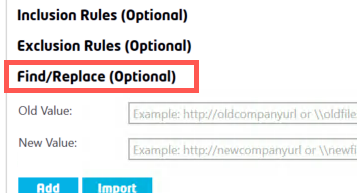
- Now click the “Show Advanced Options” button and expand the “File/Replace” option.
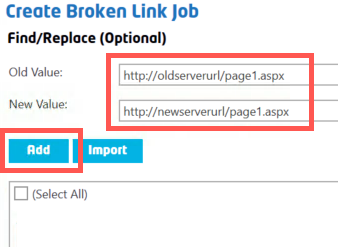
When replacing values, it is normally due to a migration or perhaps a URL/location address change. You can define multiple find replace string logic to find the values you need to update. However, it is suggested that you set mappings to the top-level domain name that has changed and then add any relative URL’s after that as new “Find/Replace” string values. - Enter the Old URL value and New URL value
Such as add “http://oldurl” mapped to “https://newurl”
You can also add a 'partial path' such as
Old Value
"/sites/sitecollection1/lists/customlist-longname"
New Value
"/sites/sc1/lists/ist-name"
Be sure to split up the domain portion of the URL in a separate entry from the site path:
For example:
Add "https://oldname mapped to "Add "https://newname.sharepoint.com" (NOTE: Remove trailing slashes)
Add “/sites/oldsitecollection/” mapped to “/sites/newsitecollection/” (NOTE: Keep trailing slashes in relative path)
as 2 separate find replace matches. This helps keep things cleaner and also allows the tool to properly handle all of the relative path replacements needed.
If promoting a subsite to a site collection you would add something like below: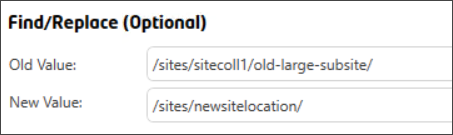
and finally: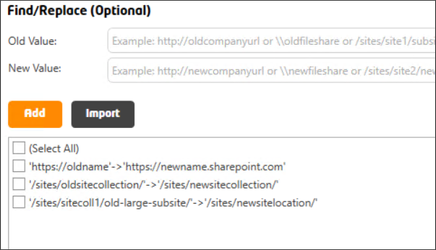
This breaks up the logic so that it makes more sense to construct, as well as ensuring that all links with the absolute URL such as those that reference the old URL, get replaced, and any relative paths will be handled with secondary logic. Within the previously ran report, there were broken links to file server documents, that needed to be updated.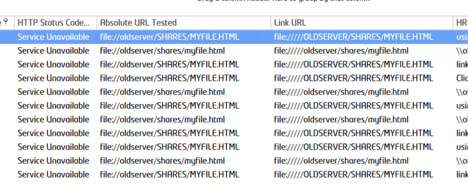
The “Find/Replace” will modify any string value needed. Enter the required values for the “Old” and “New” values, then press the “Add” button.
Below is another example, this time for UNC paths (network file shares)
- After clicking the “Add” button the entries are added as a mapping.
or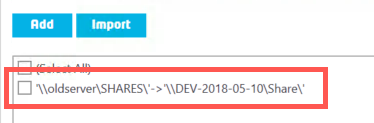
On the right there is an option to “Flag Only”.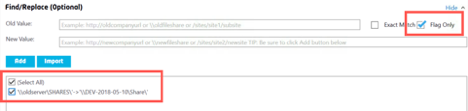
NOTE: You do not need to select the check boxes prior to running the job, these check boxes are only used for selecting rules to Delete.
The "Flag Only" option will utilize the Find Replace rules added, but make no changes. However, it will flag the items that match the “Find/Replace” query. The results that are flagged to the defined mappings will display a “*” next to them denoting they were flagged only.
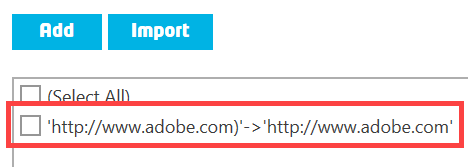
If you provide a different 'New URL' value, you will see a preview of the change in the column "New Link URL"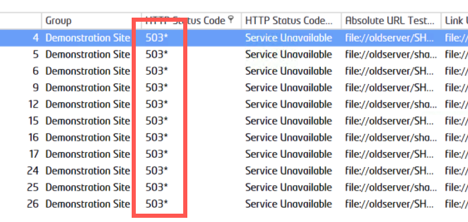
Checking the “Flag Only” option also disables the versioning options below the mappings. If a value was checked or unchecked previous to setting the “Flag Only” value, you will then no longer be able to modify them.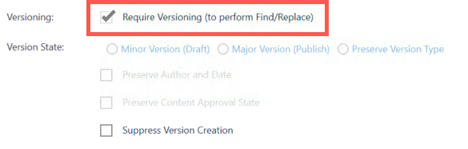
To execute the actual “Find/Replace” to perform the updates, ensure you uncheck the “Flag Only” option.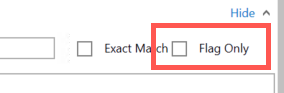
- You can then set the “Versioning” settings as needed. Choosing the “Require Versioning (to perform Find/Replace)” will only make changes if versioning is enabled on the location where the content is stored.
Version state can be set to either minor or major or retain the existing version state. As part of the versioning, you have the ability to “Preserve Author and Date” ensuring the last modified details are not modified as changes are made. Also, the current content approval status can be retained if that is used. You can also easily suppress the version creation process.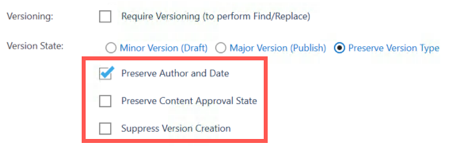
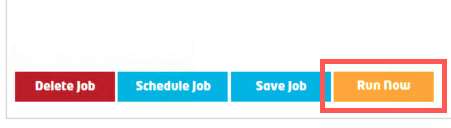
- Now, click "Run Now" to start the job:
Reviewing the Report
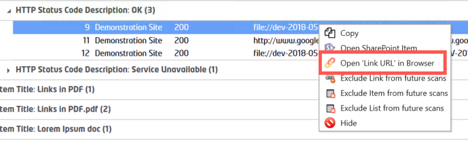
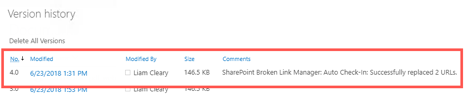
During the “Find/Replace” process comments are added to the version history (if enabled) automatically logging an entry for the replacement. After the update job is completed, checking the results will show the updates were completed, reflecting the values entered in the mappings.
Right clicking on an item will display a menu, allowing you to open the item or the URL directly and view other properties and values.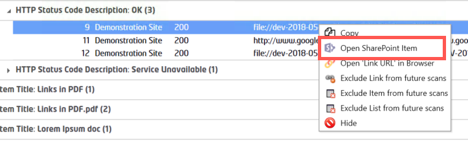
Navigating directly to the item or file within SharePoint, right-clicking and choosing “Version History” will the display the added comment written by the “File/Replace” job.
NOTE: You may notice 2 versions created in the version history for the "Find/Replace". If you see 2 versions created for the "Find/Replace", do not worry, this is normal, one version/update was to replace links and another was to preserve the author/last modified information. Depending on if there are links inside the content of the files and also in the metadata, there may sometimes be just 1 extra version created in version history, otherwise 2. You can also use the option "Suppress Version Creation" to force the tool to not create a new version.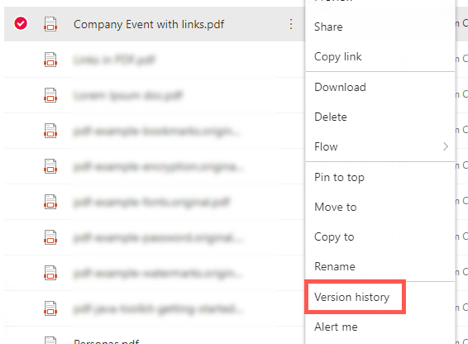
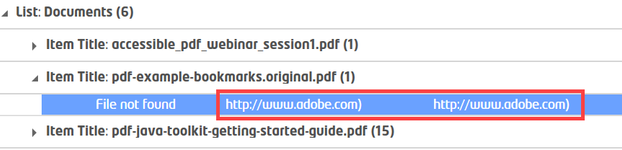
Not only documents that can be updated. Pages stored within SharePoint, are also scanned for “Broken Links” and can also be updated. In the results simply look for the pages that need to be updated, as well as URLs.
Specific Page Content

Specific URL within Document
For the “Find/Replace” job, add the new mappings, just as the file server mappings were done. You can type specific URLs to pages as needed, or simply use the same logic as the UNC file replacement, by using wildcards.
Specific Page URL
Link URLs within Document
Site Link URLs
Press the “Add” button and then select the added mappings. Remember that they can be added to an existing list of mappings too. Execute the job as before and then check the results.
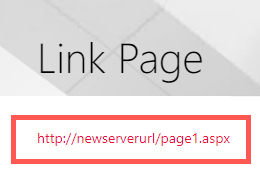
Specific Page Updating

Wildcard Page Updating
After the jobs have run, checking the actual content within SharePoint, the URL is updated to reflect the added mappings for both specific page URLs as well as the Wildcard values, within Pages and documents.
The “Broken Link” manager allows any string value to be modified and updated based on the mappings applied to the “Find/Replace” section. This makes a migration of content process much easier, ensuring that all links function as they should.
Related articles
©2018 QiPoint
2500 Plaza 5, 25th Floor
Harborside Financial Center
Jersey City, NJ 07311
http://www.qipoint.com
Microsoft, Windows, SharePoint, and the SharePoint logos, are either registered trademarks or trademarks of Microsoft Corporation.