Author: The content of this macro can only be viewed by users who have logged in.
This article applies to SharePoint Essentials Toolkit v6.1.3.0 and later
After running a “Broken Link” report the next logical step is to automatically fix the found links with the correct values. This process supports all SharePoint web pages, web parts including web part properties, page properties such as title, as well as JavaScript links. SharePoint list items and files are supported, as well as file metadata, and scanning inside files such as PDFs, Word, Excel, Excel Formulas, InfoPath forms, and any other supported file type. If the content is either using native SharePoint capabilities or supported file types, then Broken Links can be found.
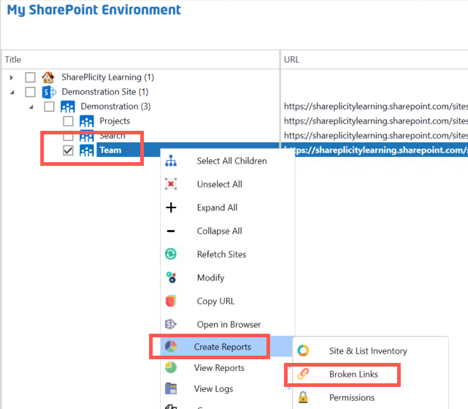
To do this, navigate to the “My SharePoint Environment” dashboard, right lick the location you wish to use, choose “Create Reports”, then “Broken Links”.
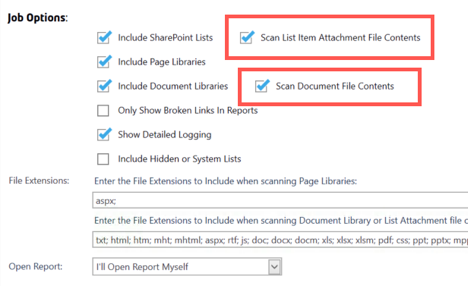
Ensure the select location is correct by checking the dropdown value.

Ensure that in the “Job Options”, “Scan List Item Attachment File Contents” and “Scan Document File Contents” are both checked.
Now click the “Show Advanced Options” button and expand the “File/Replace” option.
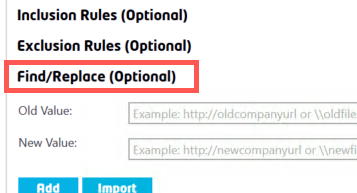
When replacing values, it is normally due to a migration or perhaps a URL/location address change. You can define multiple find replace string logic to find the values you need to update. However, it is suggested that you set mappings to the top-level domain name that has changed and then add any relative URL’s after that as new “Find/Replace” string values.
For example:
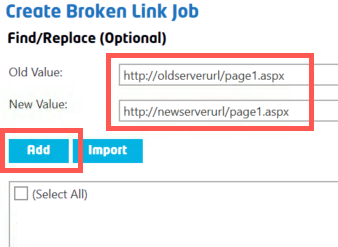
Add “http://oldurl” mapped to “https://newurl”
Add “/sites/oldsitecollection” mapped to “/sites/newsitecollection”
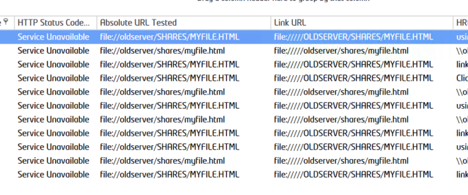
This breaks up the logic so that it makes more sense to construct, as well as ensuring that all links with the absolute URL such as those that reference the old URL, get replaced, and any relative paths will be handled with secondary logic. Within the previously ran report, there were broken links to file server documents, that needed to be updated.
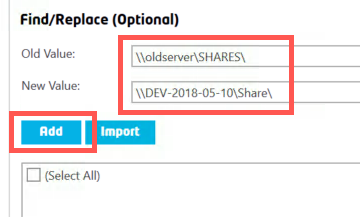
The “Find/Replace” will modify any string value needed. Enter the required values for the “Old” and “New” values, then press the “Add” button.
After clicking the “Add” button the entries are added as a mapping.
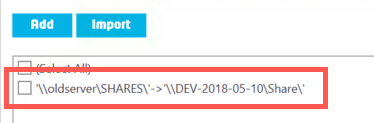
To utilize this mapping, ensure you check the box for it. If you do not check the box, it will not be used at all. On the right there is an option to “Flag Only”.
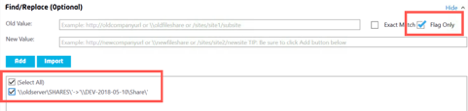
This option, will utilize the checked added rules, but make no changes. However, it will flag the items that match the “Find/Replace” query. The results that are flagged to the defined mappings will display a “*” next to them denoting they were flagged only.

Checking the “Flag Only” option also disables the versioning options below the mappings. If a value was checked or unchecked previous to setting the “Flag Only” value, you will then no longer be able to modify them.

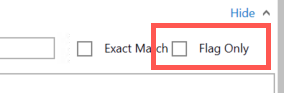
To execute the actual “Find/Replace” to perform the updates, ensure you uncheck the “Flag Only” option.
You can then set the “Versioning” settings as needed. Choosing the “Require Versioning (to perform Find/Replace)” will only make changes if versioning is enabled on the location where the content is stored.
Version state can be set to either minor or major or retain the existing version state. As part of the versioning, you have the ability to “Preserve Author and Date” ensuring the last modified details are not modified as changes are made. Also, the current content approval status can be retained if that is used. You can also easily suppress the version creation process.

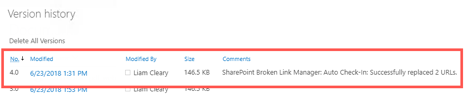
During the “Find/Replace” process comments are added to the version history (if enabled) automatically logging an entry for the replacement. After the update job is completed, checking the results will show the updates were completed, reflecting the values entered in the mappings.

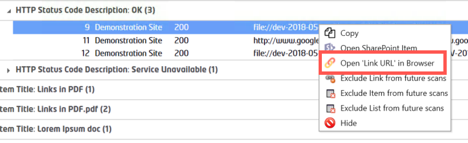
Right clicking on an item will display a menu, allowing you to open the item or the URL directly and view other properties and values.

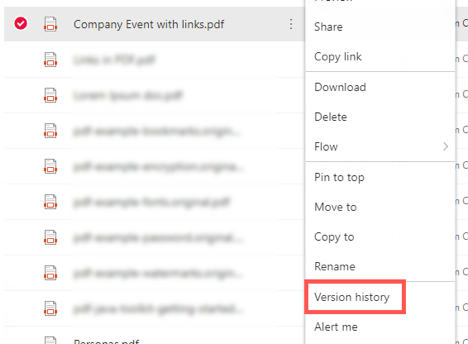
Navigating directly to the item or file within SharePoint, right-clicking and choosing “Version History” will the display the added comment written by the “File/Replace” job.
NOTE: You may notice 2 versions created in the version history for the "Find/Replace". If you see 2 versions created for the "Find/Replace", do not worry, this is normal, one version/update was to replace links and another was to preserve the author/last modified information. Depending on if there are links inside the content of the files and also in the metadata, there may sometimes be just 1 extra version created in version history, otherwise 2. You can also use the option "Suppress Version Creation" to force the tool to not create a new version.
It is not only documents that can be updated. Pages stored within SharePoint, are also scanned for “Broken Links” and can also be updated. In the results simply look for the pages that need to be updated.

For the “Find/Replace” job, add the new mappings, just as the file server mappings were done.
Press the “Add” button and then select the added mappings. Remember that they can added to an existing list of mappings too. Execute the job as before and then check the results.

Checking the actual page within SharePoint, the URL is updated to reflect the added mappings.

The “Broken Link” manager allows any string value to be modified and updated based on the mappings applied to the “Find/Replace” section. This makes a migration of content process much easier, ensuring that all links function as they should.
Related articles